Constant Literals in Objective-C

Starting with 2014, when Swift was announced, Objective-C material has been sparse in WWDC sessions, release notes, and new features . However, almost every year, there has been something new that makes life a little easier for those of us still using the language. WWDC 2021 is no exception. This year, clang has gained a new Objective-C feature called Constant Literals. In this post, I’ll explain what Constant Literals are and how to use them, along with some nice extra functionality added to the command-line plutil to work with them.

String Literals

For as long as I’ve been writing Objective-C, NSString literals have been available. You can include a string in your program by surrounding the text of the string with double quotes prefixed with an @ symbol:

NSString *name = @“Andrew”;
[self doSomethingWithAString:@“I’m a string”];

Strings created this way are stored in a TEXT section of the compiled binary. The compiler automatically uniques them, ensuring that there’s only one instance of a given string, no matter how many times it appears in the source code.

Strings created this way are considered static expressions and can be used to initialize global variables. This is used very frequently in Objective-C, including in numerous places in the Cocoa frameworks. One common use case is to define globally-visible notification name constants:

static NSString * const CustomNotificationName = @"CustomNotificationName";

Other Object Literals

In 2012, with the release of Xcode 4.4 and LLVM 4.0, Apple introduced Objective-C literals for three more common Objective-C types: NSArray, NSDictionary, and NSNumber. The syntax for them is similar to the syntax for NSString literals.

NSNumber *number = @42;
NSArray *array = @[@“Woz”, @“Steve Jobs”, @“Ron Wayne”];
NSDictionary *fruitsByColor = @{
@“red”: @“apple”,
@“yellow”: @“orange”,
@“purple” @“grape”,
};

Previous to this, instances of these classes could only be created with regular Objective-C initializer call syntax, which was much more verbose and harder to read. This was a really nice new feature, and is now taken for granted.

However, unlike NSStrings, these literals were just syntactic sugar for calls to the regular alloc/init methods at runtime, and as such they couldn’t be used to initialize global variables. Trying to do so would produce an error:

Screen Shot 2021 06 07 at 11 23 49 PM

Objective-C (and C) require the expression used for the initializer of a global variable to be a compile-time constant. While this looks like a simple constant it’s really something like:

static NSNumber * const luckyNumber = [[NSNumber alloc] initWithInt:7];

At runtime, @7 ends up being a call to +alloc and +initWithInt: on NSNumber, and goes through the usual Objective-C message send machinery.

I’ve frequently wished I could initialize global dictionary, array, and number variables with literals in Objective-C, and have resorted to workarounds including class methods/properties to access a global that is initialized at runtime using dispatch_once. This works, but it’s clunky, requires a bunch of ugly boilerplate, more complicated code at callsites, etc.

Constant Literals in Xcode 13/Clang 13

Xcode 13 ships with a new major release of Clang/LLVM, version 13. New in this release is support for constant literals for NSNumber, NSArray, and NSDictionary. It can be turned on by passing the new -fobjc-constant-literals flag to clang on the command-line when compiling:

clang -fobjc-constant-literals -framework Foundation test.m

This option is also enabled by default in Xcode 13 so you don’t need to do anything to start using it in your Xcode projects.

With this feature enabled, you can create global constant variables that are instances of NSNumber, NSArray, and NSDictionary, including nesting these types.

The below example program includes three global variables: luckyNumber, favoriteFoods, and peopleByBirthMonth, which are an NSNumber, NSArray, and NSDictionary respectively.

#import 

static NSNumber * const luckyNumber = @7;
static NSArray * const favoriteFoods = @[@"🍜", @"🍕", @"🍛", @"🍔", @"🍍"];
static NSDictionary * const peopleByBirthMonth = @{
  @"February": @[@"Steve Jobs”],
  @"August": @[@"Woz”],
  @"October": @[@"Bill Gates”],
  @"December": @[@"Ada Lovelace", @"Grace Hopper"],
};


int main(int argc, char *argv[]) {
  @autoreleasepool {
    NSLog(@"%@", luckyNumber);
NSLog(@"%@", favoriteFoods);
NSLog(@"%@", peopleByBirthMonth);
  }
}

If you try to build this with an older version of clang or Xcode it will fail with the 'initializer element is not a compile-time constant’ errors described above.

However, you can compile it with clang version 13 like so:

clang -fno-objc-constant-literals -framework Foundation test.m

When you run it, you’ll get the expected output:

./a.out
2021-06-07 23:45:39.881 a.out[29750:5660400] 7
2021-06-07 23:45:39.881 a.out[29750:5660400] (
"\Ud83c\Udf5c",
"\Ud83c\Udf55",
"\Ud83c\Udf5b",
"\Ud83c\Udf54",
"\Ud83c\Udf4d"
)
2021-06-07 23:45:39.881 a.out[29750:5660400] {
August = (
Woz
);
December = (
"Ada Lovelace",
"Grace Hopper"
);
February = (
"Steve Jobs"
);
October = (
"Bill Gates"
);
}

Instances created using this new feature are stored as constants in the CONST section of the compiled binary. 

The release notes also say:

When possible the compiler also converts statements that are similar to the above examples but are in a non-global scope.

I’m not sure what the criteria for this being possible are, but I take this to mean that even where these kinds of literals are not used to initialize global variables, ie. anywhere else they’re used in your code, the compiler may optimize them into the CONST section of your binary.

I’d need to investigate more to be 100% certain, but I believe that literals that are so optimized don’t participate in reference counting, the same way NSString literals don’t. This should result in small but potentially important performance improvements particularly in paths where many of them are quickly created and/or released.

Limitations

There are some limitations on the use of this feature. You can arbitrarily nest these types inside each other, however all of the instances in the hierarchy must be constant as well. This won’t work:

static NSDictionary * const heterogeneousDictionary = @{
@"key1": @"value1",
@"key2": @2,
@"key3": @(pow(2,2)),
};

You’ll get the following error:

a dictionary literal can only be used at file scope if its contents are all also constant literals and its keys are string literals

This is because pow(2,2) is not a compile-time constant.

Another requirement is that constant dictionaries can only have string keys. Unfortunately, even though it’s a relatively common pattern, you’re not allowed to use even constant NSNumbers as keys in a constant dictionary. This won’t work:

static NSDictionary * const gamesByReleaseYear = @{
@1985: @"Super Mario Bros.”,
@1989: @"Prince of Persia”,
@1991: @"Lemmings",
};

Even though all the literals in the hierarchy are constants, the keys must be strings, and trying to compile this will provoke the same error as above.

Code Generation

Say you have some structured data you’d like to include in your app. Traditionally you might put it in a plist then read that plist at runtime deserializing it into dictionaries, arrays, strings, and numbers. With the constant literals feature, it might be nicer to include it in code, since that way it can be included in your binary itself, potentially providing better performance than reading and parsing a plist at runtime.

While you can certainly do this manually, Apple has updated the plutil command line tool included with Xcode so that it can create Objective-C source files containing constant literals from plist data. As you might expect, the plist can only contain arrays, dictionaries, strings, and numbers. Given a plist like:
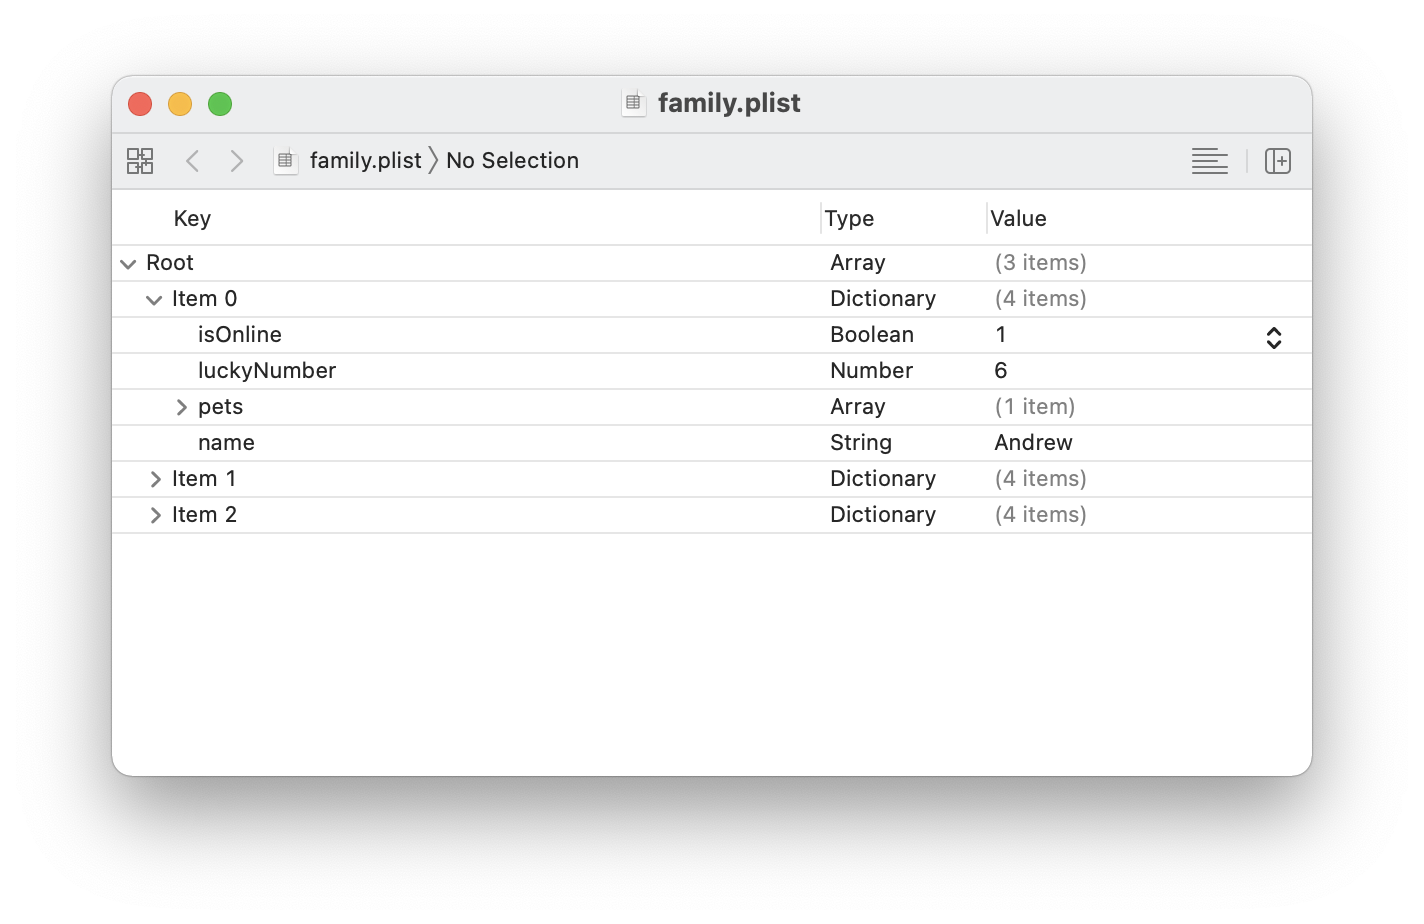
Screen Shot 2021 06 08 at 12 23 39 AM

You can convert it with plutil on the command line:

plutil -convert objc -header family.plist

This will create a Family.h and a family.m file in the current directory. (The -header flag is optional and tells plutil to generate both .h and .m files. Omit it and you’ll only get a .m file.) The .m file looks like:

#import "family.h"

/// Generated from family.plist
__attribute__((visibility("hidden")))
NSArray * const family = @[
  @{
@"isOnline" : @YES,
    @"luckyNumber" : @6,
@"name" : @"Andrew",
@"pets" : @[
      @{
        @"color" : @"white",
@"type" : @"dog",
 },
],
},
@{ … },
@{ … }
];

(Some lines collapsed for brevity.)

You could even run plutil from a build phase script to regenerate constant literal code from the plist file(s) at build time.

Conclusions

This is a great new feature and one that I’ve wished for many times over the years. I’ve worked around its absence with various solutions that require more boilerplate code, and which provide worse performance. I’m looking forward to being able to replace that code because of the availability of constant literals.

Building OpenSSL for ARM/Apple silicon Macs

I tend to shy away from dependencies when possible. But my app, Aether, has an unavoidable dependency on tqsllib, which in turn depends on OpenSSL. Originally, OpenSSL shipped with macOS, so using it was no big deal. Apple deprecated it years ago (for very good reasons) and recommends building it yourself from up-to-date source if you need it. So, I do just that.

Normally, building OpenSSL is pretty straightforward. Download the source, run:

./configure darwin64-x86_64-cc
make
make install

and you’re done.

As of right now (June 22, 2020), if you want to build it for Apple’s newly announced Macs with "Apple silicon” (aka ARM), it doesn’t work out of the box. I managed to get it to build and thought I’d share what I did. I did this on an Intel Mac running the Xcode 12.0 for macOS Universal Apps beta, but I believe these instructions should work without changes on an ARM Mac as well.  Disclaimer: This is a bit of a hack job. I expect that the OpenSSL project will add official support fairly quickly so this stuff won’t be necessary. I may try to submit a patch, but I’m not confident enough of the details here to say that it’s the best way to do things or without any lurking issues. So, as always, use this at your own risk! I’m not an SSL expert, a security expert, nor a build system expert.

Here’s how I built OpenSSL for ARM Macs:

1. Install "Xcode 12 for macOS Universal Apps beta"

2. Switch to using the beta for command line tools using:

sudo xcode-select -s /Applications/Xcode-beta.app

3. Download the OpenSSL source code:

git clone git://git.openssl.org/openssl.git

4. Switch to the openssl directory:

cd openssl

Optional 4b. I need OpenSSL 1.1.1, so I switched to that branch:

git switch OpenSSL_1_1_1-stable

5. Open the file Configurations/10-main.conf in your favorite text editor:

bbedit Configurations/10-main.conf

6. OpenSSL uses its own configuration system, and it uses this to configure certain things when building for a particular target. Most importantly, we need to specify the correct architecture (arm64) for Apple silicon/ARM Macs. To do this, find the section where the configuration for darwin64-x86_64-cc is defined. It’s line 1552 as I write this. Add the following new configuration for ARM Macs under it:

"darwin64-arm64-cc" => {
inherit_from => [ "darwin-common", asm("aarch64_asm") ],
CFLAGS => add("-Wall"),
cflags => add("-arch arm64"),
lib_cppflags => add("-DL_ENDIAN"),
bn_ops => "SIXTY_FOUR_BIT_LONG",
perlasm_scheme => "macosx",
},

7. Build for ARM by running the configure script, followed by make and make install. This will build for arm64, and place the results in /tmp/openssl-arm

./Configure darwin64-arm64-cc --prefix="/tmp/openssl-arm" no-asm
make
make install

The no-asm option tells the build system to avoid using assembly language routines, instead falling back to C routines. This prevents errors during build on ARM. The same option is not necessary for the x86 build. I’m sure there’s a way to fix building the ASM routines for arm64 (they build fine for iOS), but it’s beyond me right now.

8. Build for x86_64 by running the build steps again again like so:

./Configure darwin64-x86_64-cc --prefix="/tmp/openssl-x86"
make
make install

9. Lipo the results together to create a single, universal static library:

lipo /tmp/openssl-arm/lib/libssl.a /tmp/openssl-x86/lib/libssl.a -create -output libopenssl/lib/libssl.a
lipo /tmp/openssl-arm/lib/libcrypto.a /tmp/openssl-x86/lib/libcrypto.a -create -output libopenssl/lib/libcrypto.a

10. You’ll also need the headers. I just copy them like so:

cp /tmp/openssl-arm/include/openssl/* include/openssl/

11. If everything worked, you’ll now have static library binaries for libcrypto and libssl in lib/, along with headers in include/openssl/

First Day

Today is my first day at Luma Touch. I’m joining them as a Principal Software Engineer. I'll be working on their incredible iOS apps, including LumaFusion. I talked about leaving Lambda in my last post. I wouldn’t have left if I weren’t incredibly excited about where I was going.

Luma Touch’s biggest product is LumaFusion, a professional video editing app for iOS. LumaFusion has a big, passionate user base made up of video professionals as well as “regular people”. They have a solid roadmap with lots of fun stuff to work on in the weeks, months, and years to come.

At Luma Touch, I’m joining a team of engineers I’ve known and respected for a while, including one of my former students. I'll get to work with a group of engineers with varying experience levels, and hope to be able to mentor those who are newer to the industry.

I’m most fulfilled when I get to work on things that people use because they love them. I got into Mac development, and later iOS development, precisely because I loved the user-focused, design-first approach that apps on the Mac platform took. I wanted to build the same kinds of things that I loved using myself. I’ve been lucky enough to spend most of my software engineering career working on just those kinds of apps. I also have a background in media programming and even some video editing and production experience (a long time ago!).

With all of this in mind, Luma Touch feels like a perfect fit.

Last Day

My Team at Lambda

A gift from my team on my last day.

Today is my last day at Lambda School. I’m really excited about what’s next, but first I wanted to write down my thoughts about Lambda and my time there. I started at Lambda in March 2018, just over 2 years ago. At the beginning of 2015, my friend Caleb Hicks was starting the full-time immersive iOS program at DevMountain. He asked me to come in to do a guest lecture. Teaching in a formal setting seemed like fun, so of course I said yes. I had a blast teaching a bunch of eager, brand-new iOS developers about SceneKit. He asked me to keep coming back, and soon I was teaching once a week.

A year and a half later, I joined DevMountain full time to run their iOS program. It was a nice change of pace from engineering, and I loved getting to work with students every day. Every teacher will tell you about the feeling of watching a student learning something from scratch and the excitement they feel when they suddenly can do something that seemed impossible just a little while ago. There’s nothing that compares. Having a job where I got to be part of that every day was great, and that it still let me exercise my expertise in programming was even better. I learned a ton, got a lot better at teaching, and most importantly got to be directly involved in helping a bunch of people start their iOS development careers.

Lambda School started in mid-2017. I had known of Austen Allred, the CEO and co-founder, from Twitter, mutual friends, and his work on a previous startup, Grasswire. That summer, I was interviewing at Apple for an engineering job, and staying with Caleb in San Jose during WWDC. Caleb was at Apple working on the Everyone Can Code project, and was talking to Lambda’s founders about maybe joining them. I got an offer to work on an incredible team at Apple, and was very seriously considering taking it. At the last minute, partly because I had Lambda in the back of my mind, I decided it wasn’t the right move for me. That fall, Caleb left Apple to join Lambda, and we had already started talking about me joining him there. A few months later, I left DevMountain to start Lambda’s iOS program.

At the time, Lambda was small, with around 20 full time employees. Our only physical office was in a small business park in Pleasanton, CA, though only 3 or 4 people worked there regularly. I’m used to working at companies this size, and it’s the sweet spot for me. Those of us in Utah got together for lunch every week, I talked to people working on everything going on at the company regularly, and felt like I had a big impact. In short, it was great, and quickly became my favorite job ever. I’ve worked with smart people, but the group of people at Lambda were some of the smartest, most ambitious people I know. It didn’t hurt that a number of them were existing friends.

We launched the iOS program at Lambda in July of 2018 and I taught the entire first cohort myself. Halfway through the course, I started to “run out” of curriculum that I had already written. It meant that I was staying up late almost every night writing lessons, creating project assignments, recording videos, etc. only to get up the next morning to teach. Anyone who has taught knows how fulfilling it is, but also that it’s not exactly relaxing! I’ve rarely worked harder, but it was a blast. Every day I got to work directly with a small group of students taking a chance on a brand new program. I was continually impressed by how hard they worked, how eager they were to learn, and how fun they were to be around. I’m proud to say that nearly all of them are now out in the industry working as iOS developers on amazing things. It was one of my favorite few months of my entire career. I got to hire a team of full-time iOS instructors who are still there, still teaching, and still changing students’ lives.

A year or so ago, I moved into a role where I was building and leading Lambda’s dedicated curriculum team. I got to assemble a team of curriculum developers, and building that team is the project I’m most proud of. I’m convinced there’s not a better group of people in the world. I’m impressed by them every day, and love working with them. Not getting to work with them is the thing about leaving Lambda that I’m saddest about. I’m really excited to follow what they do from the outside, though. If you have any doubt about the people making Lambda happen, go talk to the curriculum team. You’ll find some of the smartest, most accomplished, most interesting, driven, and most importantly, kind people anywhere in the world.

As all of this has happened, Lambda has grown. The company is in the neighborhood of 200 full time staff now, with thousands of students. It has changed a great deal in the two years I’ve been here. Many of the changes have been great, a blast to be a part of, and have helped us get even better at helping students change their lives. There have also been some growing pains, but even those have been an important part of the story, and have taught me a lot.

So, if Lambda’s so great, why am I leaving? I’ve been in tech education full time for about 4 years now. I’ve loved it, but I am an engineer at heart, and have been my entire life. Solving problems, especially deep technical problems, is the work my brain likes most. The past eight months, I’ve had some contract work for a few clients doing audio programming for iOS, which is right up my alley, and I’ve found myself looking forward to evenings and weekends when I could work on it. Simultaneously, I’ve felt like, while my engineering ability isn’t declining, I’m not pushing myself in that area. It makes me feel like I’m falling behind. In short, as much as I’ve loved being in education, it’s just time for me to be an engineer again.

I’ll share more about my new job next week, but I’m incredibly excited about where I’m going. It’s exactly the kind of project I love most, working with a very small team of people, including some I’ve known and respected for a while, on a native iOS app that people buy if — and only if — it’s excellent. I’ll even have one of my former students as a teammate. It feels like an opportunity tailor made for me, and when it came along, it was obvious pretty quickly that it was the right move for me to make.

I’ll miss Lambda, especially the friends -- coworkers and students -- I’ve gotten to know. It’s the best job I’ve ever had, and I couldn’t be more grateful for my time here. I’m extremely optimistic about their future, will be rooting for them, and if I’m lucky, they’ll invite me back to teach, even if only part-time.

P.S. Lambda had to lay off some people a couple weeks back due to the effects of COVID-19. I wasn’t part of this group, having decided to take this new job well before lay offs happened. Some really good people were affected, and you should snap them up if you’re hiring. Get in touch if you want recommendations.

Remapping ⌘-. (command-period) to BREAK in iTerm2

I switched to iTerm2 from the default macOS Terminal app a few months ago. Mostly, I really like it. It has a ton of power-user features missing in Terminal.app, as well as a nice ecosystem of enhancements. However, there are a few differences that have bugged me.

In Terminal.app, instead of pressing ^C to send a break, and thereby terminate a running program, etc., you can press the standard Mac cancel keyboard shortcut, which is ⌘-. (command-period). This is built into my muscle memory, and is used widely through the Mac interface, as it has been for decades. Out of the box, iTerm2 doesn’t recognize ⌘-. as BREAK, instead filling your terminal with escape sequences.

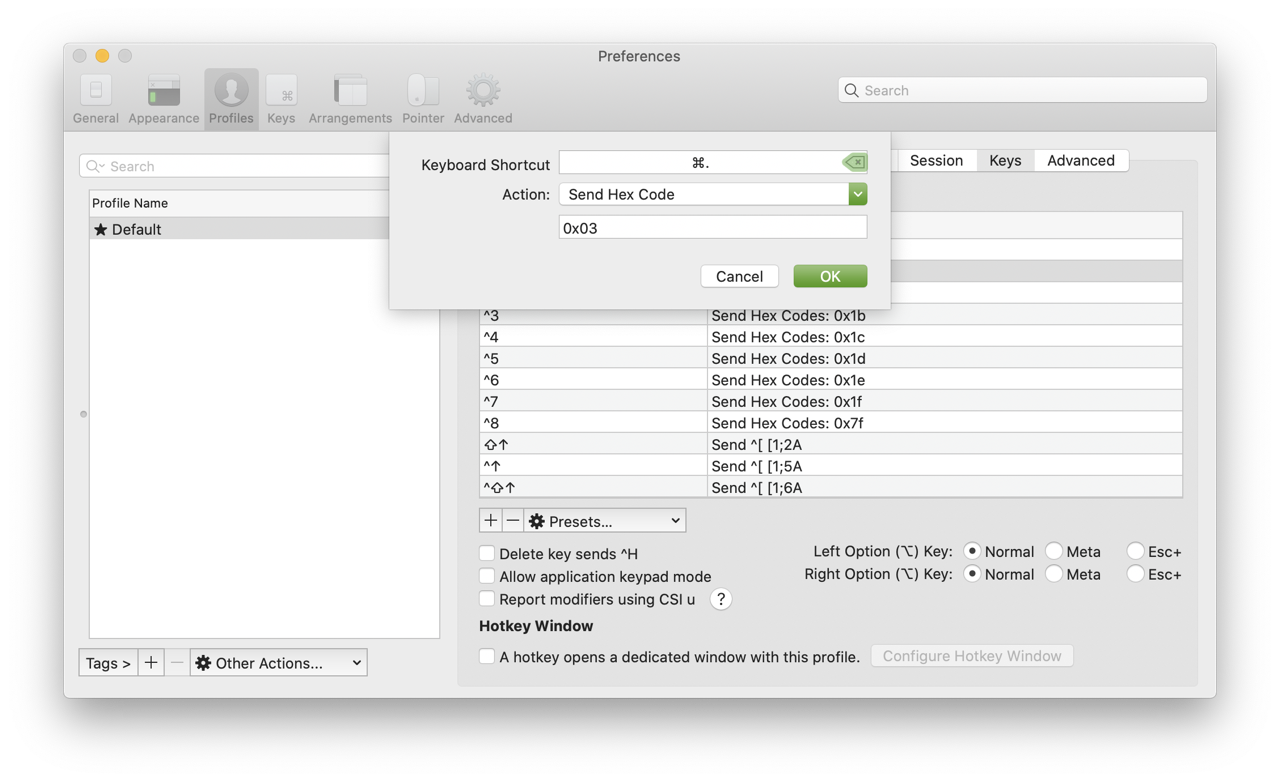
Of course, iTerm2 is extremely customizable, so it’s a fairly simple matter to remap ⌘-. to send break. To do so, open iTerm2’s Preferences, select the Profiles pane, then the Keys tab. Click the “+” button below the list of keyboard shortcuts to create a new short cut. Record the shortcut itself by selecting the Keyboard Shortcut field and pressing the Command and Period keys. For Action, select “Send Hex Code”. In the text field at the bottom, enter 0x03, which is ASCII for “end of text” (ETX), which is what control-C actually sends in a regular terminal. Click OK and you’re done.

Screen Shot 2020 01 25 at 4 19 17 PM

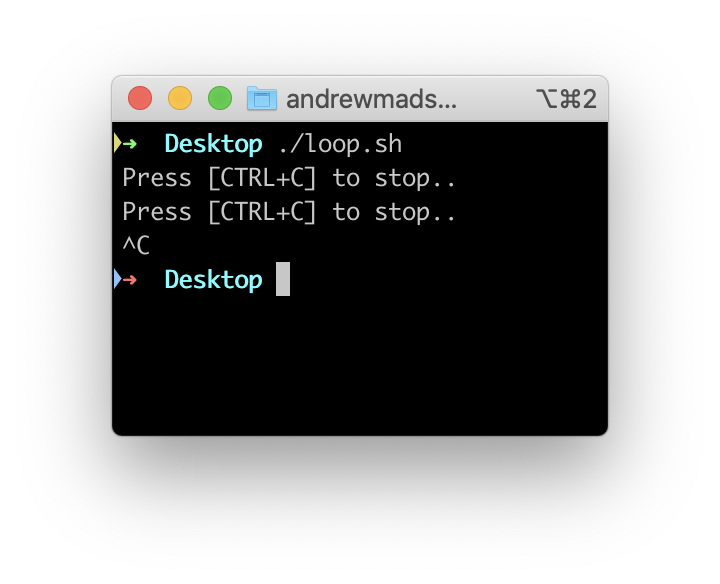
You can test it out by running something that takes a while, for example an infinitely looping shell script (see below), then pressing ⌘-. to make sure it actually breaks/stops.

#!/bin/bash
while :
do
echo "Press [CTRL+C] to stop.."
sleep 1
done

Screen Shot 2020 01 25 at 4 29 13 PM

Crosley RSD3 Counterweight Fix

For Christmas, I got a Crosley RSD3 3” mini turntable. It’s definitely a novelty, not a serious device, but it’s fun nonetheless. It plays 3” vinyl singles (which are unfortunately quite expensive), runs on batteries or USB power, and has a built in speaker.

The Problem

Out of the box, I noticed that while it actually has a real stylus (Audio Technica NP5), the tracking force is so high that the record won’t reliably turn with the stylus down! Even if the high tracking force didn’t cause the record to stop turning, it’s so high that it would likely damage the record and/or the stylus. I used my tracking force gauge to measure it, and found that it was literally off the scale. After playing around with the built in counterweight — which is sort of adjustable — without being able to bring the tracking force down, I decided to design something to fix it.

The Solution

Using the excellent ShapeScript, I designed and 3D printed a little adapter that fits over the built in counter weight, and has spots to insert #8-32 nuts (which I had laying around) to increase the counterweight and thereby decrease the tracking force. With 6 nuts inserted, the tracking force is about 2.5 grams, which is in spec for the stylus, and allows the turntable to spin just fine with the stylus down.

I’ve put the 3D model for the adapter up on Thingiverse so anyone can download and print it. It’s intentionally designed to be easily removable without damaging the turntable. It also doesn’t interfere with the included dust cover for the turntable.

Tips

It’s easiest to remove the built in counterweight before installing this adapter. Just remove the screw in the center, and pull the counterweight straight off. You can then press it into the hole in the adapter before reinstalling the whole thing on the tone arm. If you want to secure the nuts, use a soldering iron to gently melt down the top of the post going through each nut. It will mushroom out a little holding the nut in place.

IMG 0813

How many apps use Swift in 2019?

Three years ago, I read a blog post by Ryan Olsen where he explored how many of the top 100 apps on the app store were using Swift. He was surprised that at the time, only 11% of the top 100 apps were using Swift (I wasn’t).

I thought it would be interesting to revisit this in early 2019. Swift has been out for going on 5 years now, Swift 5 will be released soon, and my perception is that Swift has been broadly adopted across the iOS development community. But, what do the numbers say?

I downloaded the top 110 free apps on the app store on January 15, 2019. I decrypted them, then wrote a script that does some simple analysis of their contents to determine whether or not they’re using Swift, and roughly how much of the app is written in Swift.

Results

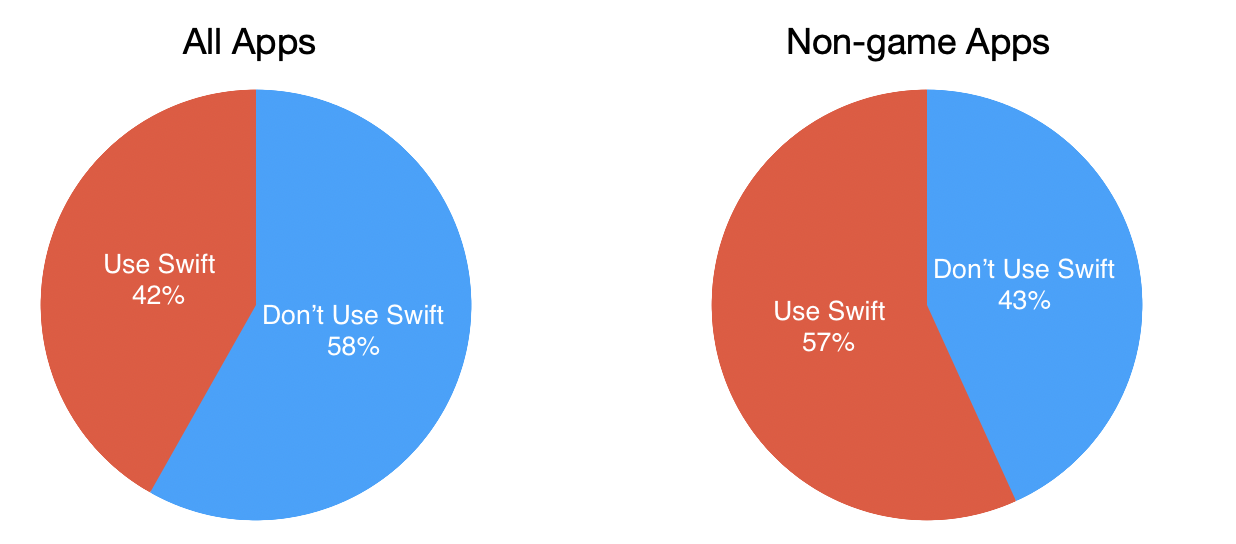
According to this analysis, of the top 110 apps on the app store on January 15, 2019, 42% are using Swift, while 58% are not. If only the 79 non-game apps are considered, the results are that 57% are using Swift, while 43% are not.

Pie charts showing apps using Swift

Interestingly, of the 31 games, none are using Swift at all. My guess is that most if not all of them are written using Unity or another cross-platform game engine, and therefore don’t have much if any iOS-specific code. I did look at a few of them myself and noticed that while the games I analyzed do have Objective-C classes, they seem to be mostly code from various analytics and social media frameworks, not code that was actually written specifically for the game itself.

Methodology

The apps were analyzed using a Python script that I wrote. You can find the script in this GitHub repo. A few notes about the way the script works:

In order for an app to be considered to “use Swift”, it must include libswiftCore.dylib in its Frameworks folder, and it must have at least one Objective-C compatible Swift class in the main executable. Some apps don’t use Swift in the main executable but include dynamically linked frameworks that use Swift. For this analysis, those apps are not counted as using Swift, because I wanted to get an idea of how many apps themselves were being developed in Swift.

However, this way of doing analysis is not perfect. For one thing, it will still count an app as using Swift if that app includes a staticly linked Swift library, even if the app’s own code doesn’t use Swift. There’s no foolproof way (that I know of) to automate figuring that out.

For apps using Swift, the script also tries to determine the percentage of each app’s main executable that is written in Swift. It determines the percentage of the app written in Swift by finding all the Objective-C exposed classes, and counting those written in Swift vs. those written in Objective-C. Again, this is imperfect because it doesn’t include Swift types that are not @objc classes. But it does give you a rough ballpark figure for how heavily each app uses Swift. The values here range from a minimum of 1% for the Google Drive app, up to a maximum of 80% for the Walmart app. The average percentage of each Swift-using app written in Swift is 34%.

The determination of whether an app was a game or not was made by hand by me, and is by nature somewhat subjective. For example, I didn’t consider Bitmoji or TikTok games, despite them both being fun entertainment apps.

Takeaway

In the past 3 years, Swift has gone from being used in a small minority of the most popular apps to being used in roughly half of them, which is a huge increase and shows how well Apple has done with introducing a new language. However, even for apps using Swift, they continue to use Objective-C fairly heavily. So, Objective-C is far from dead. Games continue to be written using tools that allow for cross-platform deployment, and are therefore written in languages other than Objective-C and Swift.

Data

You can find the raw data I generated in this GitHub Gist. If you do your own analysis that turns up other interesting insights, I’d love to hear about it!

# How many apps use Swift in 2019?

Three years ago, I read a blog post by Ryan Olsen where he explored how many of the top 100 apps on the app store were using Swift. He was surprised that at the time, only 11% of the top 100 apps were using Swift (I wasn’t).

I thought it would be interesting to revisit this in early 2019. Swift has been out for going on 5 years now, Swift 5 will be released soon, and my perception is that Swift has been broadly adopted across the iOS development community. But, what do the numbers say?

I downloaded the top 100 free apps (give or take) on the app store on January 15, 2019. I decrypted them, then wrote a script that does some simple analysis of their contents to determine whether or not they’re using Swift, and roughly how much of the app is written in Swift.

Results

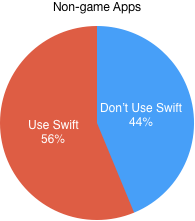
According to this analysis, of the top 110 apps on the app store on Janurary 15, 2019, 42% are using Swift, while 58% are not. If only non-game apps are considered, the results are 56% using Swift, 44% not.

Methodology

Infrastructure

Intro

I’ve found it difficult the past few years to be productive working on my own app, Aether. Part of the trouble has been that it was always difficult to release a new version. I had to manually build it, write release notes, update and reindex the built in help, create a new DMG, create a ZIP file (for Sparkle), edit the Sparkle appcast XML, and FTP everything to my server. This was a completely manual process, and each step takes a minute or two at the very least. This is just for the non-app-store version, too! It all added up to enough friction that I tended to avoid releasing updates.

Also, often when I’d sit down to work on development, I’d end up spending a significant chunk of time working through a backlog of customer support email. Customer support is very important, but it’s also really time consuming. I’d often find myself answering variations on the same questions over and over. I saved canned responses for a few common issues, but I’d still often spend 10-15 minutes answering a single email.

None of this is the thing I actually love to do: write code! In order to address these problems and give me more time to actually work on developing Aether, I’ve decided to make some infrastructure and process improvements. These have made a HUGE difference, and I’m finding it much more fun to work on the app itself again. I thought I’d outline the solutions that have worked for me, in the hopes that others may find them useful.

Build Server

I started by thinking it would be fun to write a web app to host and manage builds of Aether. Maybe I’d even use Swift on the server! Of course, that would be a huge undertaking, and I was lucky to find that a few people had already written just such a thing. I ended up using Appcaster (with some changes in my own fork), a Node.js app specifically built to host and manage Mac apps that use Sparkle for updates.

Appcaster makes it really easy to upload new builds, automatically generates and serves Sparkle appcasts, lets me write release notes in Markdown, and even allows for multiple deployment channels (e.g. Developer, Beta, Release). It also provides URLs that always point to the download and release notes for the latest version of Aether (DMG and ZIP) on each channel. Links on the Aether website point to these so that uploading a new build no longer requires any manual changes to the website at all.

Uploading New Builds

With Appcaster up and running (I’m using Heroku to host it), I wanted a way to quickly deploy new builds to the server. I wrote a quick-and-dirty Bash script to be run as an Xcode build phase. I put it in a custom target that first builds the app itself, then runs the script. The script takes the built app, creates both DMG and ZIP files for it, uploads them (along with the dSYM) to Amazon S3, then adds a new build to Appcaster. With this script, uploading a new build is as easy as selecting “Upload Aether Build” in Xcode’s scheme selector, then hitting command-B. Builds are deployed only to the Development channel by default, but can easily be promoted to Beta and/or Release. You can find the current (as of this writing) version of the script here. Disclaimer: It’s not polished, and could definitely use some improvement. I’m also far from a Bash expert.

Reducing the Customer Support Burden

A very significant portion of the customer support emails I receive are questions that could be answered by better documentation. I’ve been bad about writing good built in help due to the difficulty involved. Up until now, adding a new help page has meant writing HTML by hand, adding links to it to other pages, updating the help index, then releasing an update to Aether. It is also difficult to point people to specific help pages, even when I do have a page that would help with support.

help.aetherlog.com

The obvious solution is to put help for Aether on the web. I’m not a web developer by any means, so I wanted something that would be easy for me to set up, work well, but most importantly be easy to maintain and improve. I settled on MkDocs, a static site generator specifically designed for doing project documentation. The source for an MkDocs site is just plaintext Markdown files, along with a single YAML configuration file. It’s very easy for me to write with a text editor. Adding a new page is as simple as creating a new Markdown file and adding it to the config.yml file. The site can be rebuilt and deployed to my web host by running a single, simple Bash script. It’s not much more difficult than writing a response email. Now, when I get an email asking a question I know will come up again, I can write a help page and link to it so that my answer is valuable to more than just one person.

I decided to open source the new Aether help site. You can find it on GitHub here.

Built-in Help

Of course, a website for help is great, and really helps me with email customer support. However, I also want users to continue to be able to find and access help from within Aether. Hooking up the Aether Help menu item to open help.aetherlog.com was of course trivial. More complicated is redoing the Help menu search field that is standard in Mac apps so that it searches the website.

It turns out there’s a protocol called NSUserInterfaceItemSearching that allows you to provide custom results when the user searches using the Help menu search field. MkDocs generates a JSON file index of the entire site by default. It was pretty simple todownload and parse that to provide an index for searching. To actually do the searching, I’m using BRFullTextSearch, an Objective-C full text search engine API and wrapper for CLucene. I’m usually very hesitant to include third party libraries, but in this case it solved a problem I wasn’t interested in solving myself.

Conclusion

Good infrastructure can remove many of the tedious tasks associated with releasing, maintaining, and supporting apps, allowing for more time to focus on the fun parts of development. Making these changes has helped me refocus on improving Aether. I hope the tools I’ve talked about here are helpful to others.

Objective-C Class Properties

While looking through the release notes for Foundation in iOS 10/macOS 10.12 Sierra, I noticed an item under “Overall API Updates”

Use of class properties, in both Swift as well as Objective-C, latter using the new “@property (class)” declaration.

Xcode 8 ships with a new versions of Clang and LLVM (800.0.2.24.1, and 8.0.0 as of the first beta). The new version of Clang adds support for class properties in Objective-C. The feature is not yet fully documented anywhere that I can find1, so I did a little experimenting.

Let’s say you have a Car class and want newly created cars to have an optional, configurable default color. In Swift you can already do:

class Car {
    static var defaultColor: UIColor?
}

Previously, in Objective-C, you might have done this using:

@interface Car : NSObject
+ (UIColor *)defaultColor;
+ (UIColor *)setDefaultColor:(UIColor *)defaultColor;
@end

This has long been a fairly common approach, mirroring as it does the convention for instance property accessor methods. It is used in a number of places in the system frameworks on OS X and iOS.

With the new support for Objective-C class properties, you can now do the following:

@interface Car : NSObject
@property (class) UIColor *defaultColor
@end

Here the class specifier in the list of attributes for the @property means this will be a class property rather than an instance property.

It is important to note that unlike regular instance properties, Objective-C class properties can not be synthesized using @synthesize, nor are they automatically synthesized by the compiler. You are responsible for implementing accessor methods for them yourself. (You can also use an @dynamic for them to tell the compiler that accessor methods will be provided at runtime.) If you don’t provide methods for them, you’ll get a compiler warning, and @synthesize produces a compiler error:

Compiler warning/error

The implementation of the methods will depend on exactly what the class property does, but one common approach is to back them with a static variable:

static UIColor *_carDefaultColor = nil;

@implementation Car

+ (UIColor *)defaultColor { return _carDefaultColor; }
+ (void)setDefaultColor:(UIColor *)defaultColor { _carDefaultColor = defaultColor; }

@end

It seems a fair bet that this feature was added for better bridging into Swift, where class properties have always existed. Before real Objective-C class properties, you would have had to call the accessor methods using method/function syntax:

Car.setDefaultColor(.white())

Now, when an Objective-C class with a class property is bridged into Swift, you can use regular property syntax to access the class property:

Car.defaultColor = .white()

Of course, this feature provides a nice benefit even for pure Objective-C code, where you can now use dot-notation to access class properties:

Car.defaultColor = [UIColor whiteColor];

Presumably, in cases where it makes sense, Apple will be using the new Objective-C class properties in system API, improving bridging into Swift. It’s not clear if they will go back and update existing API to use the new syntax. So far, only NSGridView and allowsAutomaticWindowTabbing in NSWindow (both new APIs in 10.12) are using the new syntax, but that may change.

It’s nice to continue to see updates being made to Objective-C. As with last year’s addition of lightweight generics, etc., even if they’re being done primarily for bridging with Swift, they provide some nice improvements for all Objective-C programmers.


  1. It was discussed on the LLVM mailing list and bug tracker during development, of course. ↩︎

Swift on Raspberry Pi

When Apple first announced that Swift was going to be open sourced at WWDC last summer, one of my first hopes was that I could use it to write programs for Raspberry Pi. With Swift’s actual open sourcing earlier this month, I immediately set out to get the Swift compiler up and running on my Raspberry Pi 2. It turned out to be somewhat more difficult than I expected, and I ended up distracted with the holidays, etc. Thankfully, other people were working on it too.

About a week ago, William Dillon (@hpux735) announced that he had gotten the Swift compiler to successfully build for armv7 systems such as the BeagleBone, Raspberry Pi 2, etc. A while later, @iachievedit had packaged William’s work up and made it available via apt-get for Debian and Ubuntu. (Note that Swift is not yet working Raspberry Pi 1. It’s being worked on though.)

Yesterday, using their work I got Swift up and running on my own Raspberry Pi 2, and tweeted about it:

To my surprise, a lot of people were interested, and my tweet was retweeted widely, including by Chris Lattner. A number of people asked for instructions for getting up and running with Swift on Raspberry Pi, so I’m writing those up here.

A few disclaimers: I did very little to make this happen. I mostly just followed @iachievedit’s instructions for installing William Dillon’s Swift ARM packages. Still, there were a few hangups that I had to figure out, and I hope these instructions are useful. Also, Swift on ARM is still in an alpha state. The compiler itself works, but Foundation, and the Swift Package Manager are not working. Until these, especially Foundation, are up and running, it will be somewhat hard to use Swift for anything terribly useful. Anyway, instructions follow:

To start, we need to install Ubuntu 14.04 on an micro SD card (I tried to use Raspbian, and ran into a simple roadblock, but it may be possible too). The instructions for installing Ubuntu are mostly taken from this page and this page. First, download an image of Ubuntu 14.04 for Raspberry Pi 2 here. When the download finishes, unzip the downloaded file somewhere reasonable (I put it on my Desktop).

Connect the SD card to your Mac, then list all connected disks by running the following command in Terminal:

diskutil list

Find the SD card in the list, including its disk number. It will be identified as /dev/disk# where # is the disk number. You’ll need this for later steps.

Next, format the card using FAT32 like so:

diskutil eraseDisk FAT32 PiUbuntu MBRFormat /dev/disk#

(Replace # with the disk number you found above).

Now we’re ready to copy the Ubuntu image to the SD card:

sudo dd bs=1m if=~/Desktop/2015-04-06-ubuntu-trusty/2015-04-06-ubuntu-trusty.img of=/dev/rdisk#

Enter your Mac system password when prompted. (Again, replace # with the disk # found using diskutil list.)

When the copy is done, eject the SD card from your Mac, and insert it into your Raspberry Pi 2, then power up the Pi. Assuming all went well, the Pi should boot to a command prompt. We need to finish some setup steps. First, delete the second partition on the disk, by running:

sudo fdisk /dev/mmcblk0

When prompted, enter ’d’ (for delete), then ‘2’. Then, recreate the partition by entering 'n’, then 'p’, then '2’, then pressing enter at the next two prompts.

Reboot by running

sudo reboot

After the reboot, resize the partition’s file system by running:

sudo resize2fs /dev/mmcblk0p2

Setup a swap file by doing:

sudo apt-get install dphys-swapfile

If you want a GUI desktop, install Lubuntu (or Xubuntu or Kubuntu if you prefer):

sudo apt-get install lubuntu-desktop

Then reboot (sudo reboot).

After all this, we’re ready to install the Swift compiler. Following @iachievedit’s instructions, do the following:

Install libicu-dev and clang-3.6:

sudo apt-get install libicu-dev clang-3.6

Use update-alternatives to provide /usr/bin links for clang and clang++:

sudo update-alternatives --install /usr/bin/clang clang /usr/bin/clang-3.6 100
sudo update-alternatives --install /usr/bin/clang++ clang++ /usr/bin/clang++-3.6 100

Then, add @iachievedit’s repository key:

wget -qO- http://dev.iachieved.it/iachievedit.gpg.key | sudo apt-key add -

Add the appropriate repository to sources.list:

echo "deb [arch=armhf] http://iachievedit-repos.s3.amazonaws.com/ trusty main" | sudo tee --append /etc/apt/sources.list

Run apt-get update:

sudo apt-get update

Finally, install Swift!

sudo apt-get install swift-2.2

After the installation is complete, you’re ready to compile Swift programs!

Open your favorite text editor, write a program, and save it (e.g. to 'hello.swift’):

let device = "Raspberry Pi 2!"
print("Hello from Swift on \(device)")

Then compile it:

swiftc hello.swift

and run it:

./hello

Hello from Swift on Raspberry Pi 2!

That’s it! Swift running on Raspberry Pi. In order for Swift to be terribly useful on Raspberry Pi 2, more work needs to be done. See the Swift on ARM issue on the Swift bug tracker, and its child cases here. Follow that issue, along with myself, @iachievedit, and @hpux735 to keep up with what’s going on.

One thing that is needed are libraries for using the Pi’s hardware peripherals, including the GPIO pins, i2c, SPI, serial, etc. I’m working now on porting my serial port library, ORSSerialPort to Swift, in preparation for adding Linux support. I’d also like to write a library specifically for Raspberry Pi I/O in Swift, but have not yet started on it. Stay tuned for more.

MIKMIDI - A new Objective-C MIDI library

MIKMIDI is a library intended to simplify implementing MIDI functionality in OS X and iOS apps. We at Mixed In Key have released MIKMIDI as an open source project so that others can use it, and hopefully contribute to improving it. MIKMIDI is available on GitHub here and can also be installed using CocoaPods. In this post I will introduce the library, our motivation for creating it, along with an overview of the library itself.

Origins and Motivation

My day job is doing Mac and iOS development at Mixed In Key. Recently, we released our first live performance DJ software, Flow. I spent most of 2013 working on Flow, and really enjoyed the work we did (and continue to do) on it.

Like most DJ performance software, Flow allows you to connect a DJ controller (like this one, for example) to control the software when you’re on stage. There are many such controllers available from a wide variety of manufacturers, but they all use MIDI to communicate with a Mac or PC.

OS X and iOS include a system framework for dealing with MIDI, called CoreMIDI. CoreMIDI allows you to connect to and communicate with MIDI devices, as well as with other MIDI enabled apps. CoreMIDI is very powerful, but it’s a pure C API, and like its sister framework, CoreAudio, can be a bit daunting and difficult to get started with. Also, as a C API it’s not always a natural fit for a codebase mostly written in Objective-C.

MIKMIDI attempts to alleviate the difficulties of using CoreMIDI directly, by providing a well-written, purely Objective-C API for MIDI. It also adds a number of higher level features useful in a MIDI enabled app beyond the things CoreMIDI already allows.

Overview

There are essentially three major parts of MIKMIDI:

  • Device support – includes support for device discovery, connection/disconnection, and sending/receiving MIDI messages.
  • MIDI commands – includes a number of Objective-C classes that various represent MIDI message types.
  • MIDI mapping – support for generating, saving, loading, and using mapping files that associate physical MIDI controls with corresponding application features.

The first two of these, device support, and MIDI commands, mostly consist of a straightforward Objective-C wrapper for existing CoreMIDI functionality, with functionality enhancements where it makes sense. MIDI Mapping is something that CoreMIDI does not provide at all.

Note that currently, MIKMIDI is focused on working with MIDI communication rather than recorded MIDI files containing music. However, contributions to add features for working with MIDI files are certainly welcome, and I may work on them myself at some point. MIKMIDI’s ultimate goal is to make working with all aspects of MIDI easier in Objective-C.

Device Support

With MIKMIDI device support functionality, you can get a list of available MIDI devices as simply as this:

NSArray *availableDevices = [[MIKMIDIDeviceManager sharedManager] availableDevices];

MIKMIDIDeviceManager’s availableDevices property is Key Value Observing (KVO) compliant, and NSNotifications are also posted anytime a device is connected or disconnected. This makes it quite easy to create a UI that displays a list of connected devices and updates automatically as devices are added and removed.

MIKMIDIDeviceManager also makes it easy to connect to and disconnect from MIDI sources. When connecting to a source, you pass in an event handler block, which is called anytime MIDI messages are received from that source. Multiple event handlers can be connected, allowing multiple objects in an application to receive MIDI messages from the same source.

Sending a MIDI command is as simple as creating an MIKMIDICommand instance and passing it to MIKMIDIDeviceManager’s -sendCommands:toEndpoint:error: method.

MIDI devices are represented by instances of MIKMIDIDevice. MIKMIDIDevice includes properties to get the manufacturer and model name of the device, as well as to access its entities, which contain its endpoints.

MIKMIDI also allows for connecting to virtual MIDI endpoints, in order to communicate with other MIDI apps on the same computer. Available virtual ports can be found by MIKMIDIDeviceManager’s virtualSources and virtualDestinations properties.

MIDI Commands

In MIKMIDI, MIDI messages (aka commands) are Objective-C objects. Specifically, they’re instances of MIKMIDICommand or one of its subclasses. Each of MIKMIDICommand’s subclasses is used to represent a specific type of message. That way, for example, a control change message has methods for accessing controller number and value, while a note on message has methods for note number and velocity. Support for command types beyond those currently directly supported by MIKMIDI can easily be added by subclassing MIKMIDICommand.

The library includes a category on NS/UIApplication to allow easy routing of MIDI messages to interested objects in an application. This system is inspired by the Cocoa event handling architecture. This functionality will be detailed in a later blog post, and more information can be found in the documentation.

MIDI Mapping

MIKMIDI includes features to help with adding MIDI mapping support to an application. MIDI mapping refers to the ability to map physical controls on a particular hardware controller to specific functions in the application. MIKMIDI’s mapping support includes the ability to generate, save, load, and use mapping files that associate physical controls with an application’s specific functionality. A mapping between a specific controller and the application’s UI is represented by an MIKMIDIMapping object. MIKMIDIMappingGenerator can be used to manage mapping files on disk, including both user-generated and application-bundled mappings. Also included is MIKMIDIMappingGenerator, which helps with implementing a system that allows end users to easily generate their own mappings using a “MIDI learn” style interface.

In developing Flow, we found out that MIDI DJ controllers each have their own quirks and differences. The data format for MIKMIDIMapping was informed and driven by our experiences with various controllers, and the different ways they transmit control actions by the user. MIKMIDIMappingGenerator includes algorithms that attempt to interpret the messages coming from a controller and associate them with a control type (e.g. knob, button, jog wheel), without the programmer needing to know about the specific quirks of the controller being used.

What Next?

Complete documentation for MIKMIDI can be found on CocoaDocs. In follow up blog posts, I’ll provide some examples for working with MIKMIDI, including sample code. If you have any questions about MIKMIDI, suggestions for future improvement, or would like to contribute to its development, please email me, or comment below!

ORSSerialPort - A new Objective-C serial port library

ORSSerialPort

I’ve just released ORSSerialPort (github link). ORSSerialPort is my take on a modern, easy-to-use Objective-C serial port library. It’s a simple, Cocoa-like set of Objective-C classes useful for programmers writing Objective-C Cocoa apps that must communicate with external devices through a serial port (most commonly RS-232). Using ORSSerialPort to open a port and send data can be as simple as this:

ORSSerialPort *serialPort = [ORSSerialPort serialPortWithPath:@"/dev/cu.KeySerial1"];
serialPort.baudRate = [NSNumber numberWithInteger:4800];
[serialPort open];
[serialPort sendData:someData]; // someData is an NSData object
[serialPort close];

ORSSerialPort is released under an MIT license, meaning you’re free to use it in both closed and open source projects. However, even in a closed source project, you must include a publicly-accessible copy of ORSSerialPort’s copyright notice, which you can find in the LICENSE file.

If you have any questions about, suggestions for, or contributions to ORSSerialPort, please contact me. I’d also love to hear about any cool projects you’re using it in.

Background

This post will describe my motivation for writing ORSSerialPort along with how to use it and some implementation details. First, a little background. In early 2008, I released Aether, an amateur radio logging application for Mac OS X. Most commercial amateur radios made in the last 30 years or so have an RS-232 port through which various radio functions and parameters can be controlled and read. Aether uses this capability to automatically insert the frequency and mode the user’s radio is set to without requiring manual entry of these values. This explains my interest in and use for serial ports on Mac OS X.

OS X’s API for talking to serial ports is provided by IOKit along with standard POSIX functions like open(), select() and close(), etc. None of these APIs are high level Objective-C APIs, rather they’re C APIs. In order to easily integrate with other Objective-C Cocoa code, it’s nice to have Objective-C classes that can be used to communicate through serial ports. The currently shipping version of Aether uses the AMSerialPort classes for serial communication. AMSerialPort has served me well, but it’s a little more complex than I’d like, and doesn’t take advantage of the newer multiprocessing approaches provided by Grand Central Dispatch. As part of my work on the next major version of Aether, I decided to write my own serial port library to replace AMSerialPort in Aether. It’s my hope that it will also be useful to others.

How to Use ORSSerialPort

To begin using ORSSerialPort in your project, simply drag the files in the “Source” folder into your Xcode project. ORSSerialPort.h/m are required, while ORSSerialPortManager.h/m are optional, but useful (see below). Next, add #import "ORSSerialPort.h" and ’#import “ORSSerialPortManager.h”’ to the top of the source code files in which you’d like to use ORSSerialPort.

Important Note: ORSSerialPort relies Automatic Reference Counting (ARC). If you’d like to use it in a non-ARC project, you’ll need to open the Build Phases for the target(s) you’re using it in, and add the -fobjc-arc flag to the Compiler Flags column for ORSSerialPort.m and ORSSerialPortManager.m. ORSSerialPort will generate a compiler error if ARC is not enabled.

The ORSSerialPort library consists of only two classes: ORSSerialPort and ORSSerialPortManager. As its name implies, each instance of ORSSerialPort represents a serial port device. There is a 1:1 correspondence between port devices on the system and instances of ORSSerialPort. That means that repeated requests for a port object for a given device will return the same instance of ORSSerialPort.

Opening a Port and Setting It Up

You can get an ORSSerialPort instance either of two ways. The easiest is to use ORSSerialPortManager’s availablePorts array (explained below). The other way is to get a new ORSSerialPort instance using the serial port’s BSD device path:

ORSSerialPort *port = [ORSSerialPort serialPortWithPath:@"/dev/cu.KeySerial1"];

Note that you must give +serialPortWithPath: the full callout (“cu.*”) path to the device, as shown in the example above.

After you’ve got a port instance, you can open it with the -open method. When you’re done using the port, close it using the -close method.

Port settings such as baud rate, number of stop bits, parity, and flow control settings can be set using the various properties ORSSerialPort provides. Note that all of these properties are Key Value Observing (KVO) compliant. This KVO compliance also applies to read-only properties for reading the state of the CTS, DSR and DCD pins. Among other things, this means it’s easy to be notified when the state of one of these pins changes, without having to continually poll them, as well as making them easy to connect to a UI with Cocoa bindings.

Sending Data

Send data by passing an NSData object to the -sendData: method:

NSData *dataToSend = [self.sendTextField.stringValue dataUsingEncoding:NSUTF8StringEncoding];
[self.serialPort sendData:dataToSend];

Receiving Data

To receive data, you must implement the ORSSerialPortDelegate protocol’s -serialPort:didReceiveData: method, and set the ORSSerialPort instance’s delegate property. As noted below, this method is always called on the main queue. An an example implementation is included below:

- (void)serialPort:(ORSSerialPort *)serialPort didReceiveData:(NSData *)data
{
    NSString *string = [[NSString alloc] initWithData:data encoding:NSUTF8StringEncoding];
    [self.receivedDataTextView.textStorage.mutableString appendString:string];
    [self.receivedDataTextView setNeedsDisplay:YES];
}

ORSSerialPortDelegate

ORSSerialPort includes a delegate property, and a delegate protocol called ORSSerialPortDelegate. The ORSSerialPortDelegate protocol includes two required methods:

- (void)serialPort:(ORSSerialPort *)serialPort didReceiveData:(NSData *)data;
- (void)serialPortWasRemovedFromSystem:(ORSSerialPort *)serialPort;

Also included are 3 optional methods:

- (void)serialPort:(ORSSerialPort *)serialPort didEncounterError:(NSError *)error;
- (void)serialPortWasOpened:(ORSSerialPort *)serialPort;
- (void)serialPortWasClosed:(ORSSerialPort *)serialPort;

Note: All ORSSerialPortDelegate methods are always called on the main queue. If you need to handle them on a background queue, you must dispatch your handling to a background queue in your implementations of the delegate method.

As its name implies, -serialPort:didReceiveData: is called when data is received from the serial port. Internally, ORSSerialPort receives data on a background queue to avoid burdening the main queue to simply received data. As with all other delegate methods, -serialPort:didReceiveData: is called on the main queue.

-serialPortserialPortWasRemovedFromSystem: is called when a serial port is removed from the system, for example because a USB to serial adapter was unplugged. This method is required because you must release your reference to an ORSSerialPort instance when it is removed. The behavior of ORSSerialPort instances whose underlying serial port has been removed from the system is undefined.

The three optional methods’ function can easily be discerned from their name. Note that -serialPort:didEncounterError: is always used to report errors. None of ORSSerialPort’s methods take an NSError object passed in by reference.

How to Use ORSSerialPortManager

ORSSerialPortManager is a singleton class (one instance per application) that can be used to get a list of available serial ports. It will also handle closing open serial ports when the Mac goes to sleep, and reopening them automatically on wake. This prevents problems I’ve seen with serial port drivers that can hang if the port is left open when putting the machine to sleep. Note that using ORSSerialPortManager is optional. It provides some nice functionality, but only ORSSerialPort is necessary to simply send and received data.

Using ORSSerialPortManager is simple. To get the shared serial port manager:

ORSSerialPortManager *portManager = [ORSSerialPortManager sharedSerialPortManager];

To get a list of available ports:

NSArray *availablePorts = portManager.availablePorts;

ORSSerialPortManager is Key-Value Observing (KVO) compliant for its availablePorts property. This means that you can observe availablePorts to be notified when ports are added to or removed from the system. This also means that you can easily bind UI elements to the serial port manager’s availablePorts property using Cocoa-bindings. This makes it easy to create a popup menu that displays available serial ports and updates automatically, for example.

ORSSerialPortManager’s close-on-sleep, reopen-on-wake functionality is automatic. The only thing necessary to enable it is to make sure that the singleton instance of ORSSerialPortManager has been created by calling +sharedSerialPortManager at least once.

Example Project

Included with ORSSerialPort is a demo application called ORSSerialPortDemo. This is a very simple serial terminal program. It demonstrates how to use ORSSerialPort, and may also be useful for simple testing of serial hardware.

ORSSerialPortDemo includes a dropdown menu containing all available ports on the system, controls to set baud rate, parity, number of stop bits, and flow control settings. Also included are two text fields. One is for typing characters to be sent to the serial port, the other for displaying received characters. Finally, it includes checkboxes corresponding to the RTS, DTR, CTS, DSR, and DCD pins. For the output pins (RTS, DTR), their state can be toggled using their checkbox. The input pins (CTS, DSR, DCD) are read only.

The demo application demonstrates that it is possible to setup and use a serial port with ORSSerialPort without writing a lot of “glue” code. Nearly all of the UI is implemented using Cocoa bindings. With the exception of two lines in ORSAppDelegate.m, the source code for entire application is contained in ORSSerialPortDemoController.h/m.